
The Ultimate Old-Fashioned Coconut Cream Pie: A Timeless Family Recipe
Welcome to a beloved family tradition that has graced our tables for over 35 years! This isn’t just any dessert; it’s a journey back to simpler times, a taste of genuine homemade goodness that no store-bought pie could ever hope to rival. Prepare yourself for the quintessential Old-Fashioned Coconut Cream Pie, a recipe perfected through decades and shared with love.
In a world full of shortcuts, some culinary creations simply demand a touch of dedication. This pie is a testament to that philosophy. While there are quicker alternatives, nothing compares to the rich, authentic flavors achieved by embracing the traditional method. This pie is more than just a sweet treat; it’s a delightful experience, delivering a burst of creamy, coconut pleasure with every single bite. If you’ve tried other versions of coconut cream pie that left you underwhelmed or, dare I say, a “plain mess,” then you’re in for a revelation. Our recipe promises a lush, almost pudding-like consistency that sets the bar for what this classic dessert should truly be.
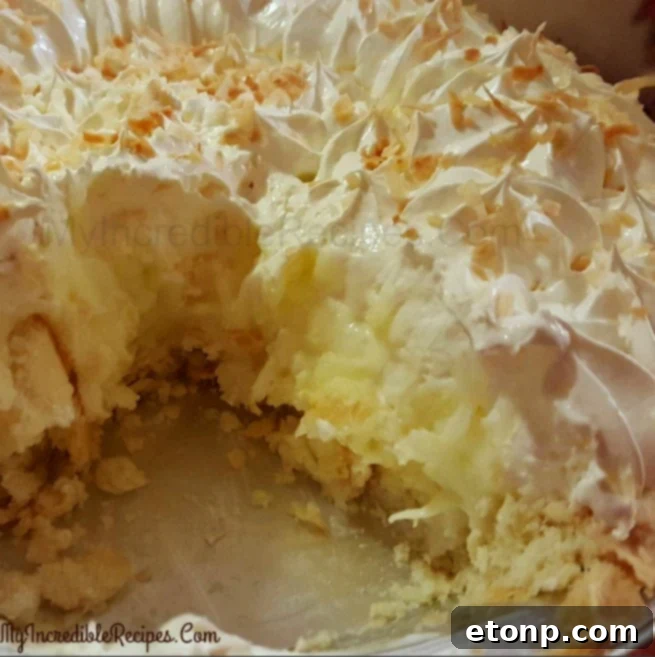
Why This Old-Fashioned Coconut Cream Pie Stands Apart
What makes our family’s Old-Fashioned Coconut Cream Pie truly special? It all comes down to the perfect balance of texture and taste. Many commercially produced or simplified coconut pies often fall short, either being too watery, too stiff, or lacking that vibrant coconut essence. Our recipe ensures a filling that’s decadently smooth and creamy, almost like a luxurious pudding, brimming with real coconut flavor. This isn’t just a pie; it’s an heirloom, a legacy of deliciousness passed down through generations. The dedication to the old-fashioned method results in a dessert that’s not only incredibly satisfying but also evokes a comforting sense of nostalgia.
We understand that carving out extra time in the kitchen isn’t always feasible, which is why we’ve also included an ‘easier’ version in this post. However, we wholeheartedly encourage you to try the traditional way at least once. The difference is truly astounding, and the reward of baking something so exquisite from scratch is immeasurable. If time is a major constraint, remember you can always cut some corners without sacrificing too much quality – for instance, focusing on the old-fashioned filling and using a quality pre-made pie crust. The choice is yours, but the journey to this incredible pie is worth every moment.
The Irresistible Allure of Homemade Coconut Cream Pie
There’s an undeniable magic to a homemade pie. The aroma filling your kitchen, the anticipation as it chills, and that first glorious bite—it’s an experience store-bought alternatives simply can’t replicate. A truly magnificent coconut cream pie should boast a tender, flaky crust, a rich, velvety filling bursting with sweet coconut, and a cloud-like topping that melts in your mouth. This recipe achieves all of that and more, delivering a dessert that’s not just delicious but deeply satisfying and comforting. It’s the kind of pie that brings smiles to faces and creates lasting memories around the dinner table.
Mastering Your Old-Fashioned Coconut Cream Pie: Essential Tips
Baking a pie from scratch can feel daunting, but with a few key tips, you’ll be a pie-making pro in no time. For the crust, the secret lies in keeping your butter and water as cold as possible. This creates pockets of steam during baking, resulting in that coveted flaky texture. Don’t overwork the dough; a light hand is crucial. For the filling, constant whisking is your best friend to prevent lumps and ensure a perfectly smooth, silky consistency. And patience, especially during the chilling phase, is paramount. A properly chilled pie allows the flavors to meld beautifully and the filling to set perfectly, making each slice a delightful experience. Pay close attention to the instructions for tempering the egg yolks, as this crucial step prevents them from scrambling and ensures a smooth, custard-like texture.
Easy Old Fashioned Coconut Cream Pie!
This classic dessert combines a flaky, buttery crust with a rich, creamy coconut filling and a generous dollop of homemade whipped cream. It’s a taste of pure nostalgia and simple elegance, perfect for any occasion. Whether you choose the traditional method for its unparalleled depth of flavor or the quicker version for convenience, this recipe guarantees a show-stopping dessert that will impress everyone.
Ingredients
For the Authentic Old-Fashioned Method
For the Flaky Pie Crust
Creating a homemade pie crust is a foundational step for an exceptional old-fashioned pie. Using cold butter and minimal handling ensures a tender, flaky texture that’s truly unmatched.
- 2 1/2 cups all-purpose flour
- 1 tsp salt
- 1 cup very cold butter cut into small cubes
- 1/4 cup ice water or more as needed
For the Rich Coconut Filling
This is where the magic happens! A perfectly smooth, creamy, and intensely coconut-flavored filling is the heart of this pie. Using whole milk ensures a rich texture, while proper tempering of the egg yolks provides that desirable pudding-like consistency.
- 1/3 cup all-purpose flour
- 2/3 cup granulated sugar
- 3 cups whole milk
- 1/3 tsp salt
- 1 cup sweetened flaked coconut fine shred preferred
- 3 slightly beaten extra large egg yolks
- 4 tablespoons unsalted butter
- 2 tsp pure vanilla extract
For the Fluffy Whipped Cream Topping
No coconut cream pie is complete without a generous crown of homemade whipped cream. It adds a light, airy contrast to the rich filling and a touch of elegance.
- 1 cup heavy whipping cream
- 1 tsp pure vanilla extract
- 3 Tablespoons confectioners’ sugar powdered sugar
For the Convenient “Even Easier” Method
For those days when time is of the essence, this simplified version still delivers a delightful coconut cream pie with minimal effort. It’s a fantastic option for a quick dessert fix without compromising too much on flavor.
- 1 premade pie crust baked and cooled
- 2 boxes 3.4 oz each instant Coconut Cream pudding mix
- 2 cups whole milk
- 1 cup shredded coconut
- 1 8 oz tub Cool Whip Free thawed
- About 1/2 cup toasted coconut for garnish
Instructions
Old-Fashioned Method Instructions: Crafting Your Perfect Pie Crust
A homemade pie crust is the foundation of an authentic old-fashioned coconut cream pie. It adds a depth of flavor and texture that is truly unparalleled. Take your time with these steps for a flaky, golden base.
-
Begin by combining the dry ingredients. In a large, chilled mixing bowl, add the 2 1/2 cups of all-purpose flour and 1 teaspoon of salt. Next, introduce the very cold butter, cut into small cubes, to the flour mixture. Using your hands or a pastry blender, gently work the butter into the flour until the mixture resembles coarse crumbs with some pea-sized pieces of butter still visible. It’s crucial not to overmix at this stage; these butter pieces are key to a flaky crust.
-
Carefully pour the 1/4 cup of ice water over the flour and butter mixture. Use a fork to gently bring the dough together. Add more ice water, one tablespoon at a time, only if absolutely necessary, until the dough just begins to form a cohesive mass. Stop mixing as soon as it comes together; over-mixing will develop the gluten too much, resulting in a tough crust.
-
Divide the prepared dough into two equal sections. Gently flatten each section into a round disc, wrap them tightly in plastic wrap, and place them in the refrigerator to rest for at least 30 minutes. This resting period allows the gluten to relax, making the dough easier to roll and ensuring a more tender crust. (This recipe yields two pie crusts; you can save the second one for another pie or freeze it for later use.)
-
Once the dough has rested, remove one disc from the refrigerator. On a lightly floured surface, roll out the dough into a circle large enough to fit your 10-inch pie plate with some overhang. Carefully transfer the rolled-out crust into the pie plate, pressing it gently into the bottom and sides. Trim any excess dough from the edges, leaving about a 1/2-inch overhang, which you can then crimp for a decorative finish.
-
Preheat your oven to 400°F (200°C). Pierce the bottom and sides of the pie crust with a fork several times to prevent it from bubbling up during baking. Bake the crust only (blind bake) for 10-14 minutes, or until it is beautifully golden brown. The crust should be fully cooked and crisp to hold the creamy filling without becoming soggy.
-
After baking, remove the pie crust from the oven and allow it to cool completely on a wire rack. It is absolutely essential that the crust is cool before you add the warm coconut filling, as this prevents the crust from becoming soft or soggy.
Old-Fashioned Method for the Creamy Coconut Filling
This is the heart of your pie – a luscious, velvety coconut custard. The key to its rich texture and deep flavor lies in gradually heating the milk and expertly tempering the egg yolks. Don’t rush these steps!
-
Begin by heating the whole milk. You can do this on the stove over medium-low heat or in the microwave. Your goal is to get the milk very hot, almost to a boiling point, with small bubbles forming around the edges, but do not let it boil over. This hot milk will be crucial for creating a smooth, thick filling.
-
In a medium-sized saucepan, combine the flour, granulated sugar, salt, and the sweetened flaked coconut. Whisk these dry ingredients together thoroughly until they are well combined. This ensures even distribution and prevents lumps once the liquid is added.
-
With your dry mixture ready, slowly begin adding the almost boiling hot milk to the saucepan. Pour in about one cup of the hot milk into the flour-sugar-coconut mixture while continuously whisking. This gradual addition and constant stirring are essential to prevent lumps and begin the thickening process without cooking the flour too quickly.
-
Place the saucepan over low heat. As you continue to whisk constantly, you will notice the filling beginning to thicken. Once it starts to thicken, gradually add the second cup of the hot milk, still whisking without interruption. Continue to stir until the mixture thickens again, reaching a custard-like consistency. The low heat prevents scorching.
-
Repeat this process for the final cup of hot milk. Pour it in slowly while continuing to stir constantly. Keep whisking until the filling has thickened for the third time, becoming rich and velvety. This layered approach ensures a consistently smooth and lump-free custard.
-
Once the filling has reached its desired thickness, remove the saucepan from the heat. This prevents further cooking and potential burning.
-
In a separate medium bowl, have your three slightly beaten extra-large egg yolks ready. To prevent the egg yolks from scrambling, you must temper them. Slowly pour about one cup of the hot coconut mixture into the beaten egg yolks, whisking vigorously the entire time. This gradually raises the temperature of the yolks without cooking them.
-
Once tempered, pour the egg yolk mixture back into the saucepan with the remaining coconut filling. Return the saucepan to low heat and cook together for approximately 2 minutes, continuing to stir constantly. The mixture should become even thicker, resembling a smooth pudding. Be vigilant not to let it boil, as this can curdle the eggs. It should be hot, but not bubbling rapidly.
-
Remove the filling from the heat. Stir in the 4 tablespoons of unsalted butter and the 2 teaspoons of pure vanilla extract until fully incorporated and melted. The butter adds richness and a silky texture, while the vanilla enhances the overall flavor profile.
-
Allow the coconut filling to cool on the counter for at least 30 minutes before pouring it into your cooled pie crust. This crucial cooling period helps the filling set properly and prevents it from making the pie crust soggy.
-
A quick note on crusts: If you used a pre-made, shelf-stable “dry” pie crust (like a graham cracker crust), you do not need to wait the 30 minutes and can pour the filling in immediately. However, if you used a homemade crust or a refrigerated pre-made pastry crust (like Pillsbury), adhering to the 30-minute cooling time is important.
-
Once the filling is in the crust, cover the pie loosely with plastic wrap (ensure the plastic wrap doesn’t touch the filling) and chill it completely in the refrigerator for a minimum of 3 hours, or preferably overnight. This extensive chilling time is vital for the pie to set firmly and for the flavors to fully develop, resulting in that desirable pudding-like consistency.
Old-Fashioned Method Topping: The Perfect Finish (Can be used on either method)
A billowy cloud of freshly whipped cream is the ideal accompaniment to this rich pie. It’s light, airy, and adds a beautiful aesthetic. This topping works perfectly for both the old-fashioned and easier pie methods.
-
In a clean, chilled mixing bowl, combine the heavy whipping cream, confectioners’ sugar, and pure vanilla extract. Using an electric mixer (handheld or stand mixer with a whisk attachment), beat the mixture on medium-high speed until firm peaks form. Be careful not to overbeat, as it can turn into butter.
-
Once your coconut cream filling is fully chilled and set in the pie crust, gently spread the freshly whipped cream evenly over the top. For a more elegant presentation, transfer the whipped cream to a pastry bag fitted with a star tip and pipe beautiful peaks across the surface of the pie.
-
For an extra touch of flavor and visual appeal, generously garnish the top of the pie with toasted coconut flakes. To toast coconut, spread it in a single layer on a baking sheet and bake at 325°F (160°C) for 5-10 minutes, stirring occasionally, until golden brown. Let it cool completely before sprinkling.
-
Slice, serve, and savor the magnificent taste of your homemade Old-Fashioned Coconut Cream Pie. Enjoy every delightful bite!
Easy Method: Quick Coconut Cream Pie
When you need a quick dessert that still delivers on flavor, this easy method is your go-to. It simplifies the process while still offering a delightful coconut treat.
-
In a large mixing bowl, combine both boxes of instant Coconut Cream pudding mix with the 2 cups of whole milk and approximately 3/4 of the thawed Cool Whip/whipped topping container. Whisk these ingredients together vigorously for about 2-3 minutes until the mixture becomes thick, smooth, and creamy. Ensure all the pudding powder is fully dissolved.
-
Gently fold in the 1 cup of shredded coconut into the pudding mixture until it is evenly combined. Use a spatula to avoid deflating the mixture and maintain its light, airy texture.
-
Pour the prepared coconut filling into your baked and cooled premade pie crust. Spread the filling evenly using the back of a spoon or a spatula, ensuring it reaches all edges of the crust.
-
Spread the remaining Cool Whip (or your homemade whipped cream, see above) carefully over the top of the pie. For an attractive finish, you can use a piping bag to create decorative swirls or peaks. Finally, sprinkle generously with toasted coconut for added texture and flavor.
-
Refrigerate the pie for at least 5 hours, or until it is completely firm and set. This chilling time is crucial for the pie to hold its shape and for the flavors to develop fully, providing that perfect slice.
-
Serve your easy coconut cream pie chilled and enjoy the sweet, tropical flavors!
Did you make this recipe?
We’d love to see your creations! Share your pictures and experiences with us on social media. For even more incredible recipes and baking inspiration, make sure to follow us on Pinterest!
Share on Facebook