
The Ultimate Festive Treat: Easy Candy Cane Cheese Danish!
As the holiday season swiftly approaches, bringing with it the cheer of gatherings and the warmth of shared meals, there’s an undeniable desire to create something truly special. Something that not only tastes incredible but also looks spectacular on your festive table. This year, allow me to introduce you to a recipe that promises to do just that: our delightful Candy Cane Cheese Danish. Imagine a treat so simple to make, yet so utterly decadent, it will earn you endless compliments from friends and family alike.
Last Christmas, I had the pleasure of baking this incredible danish, and while it was a resounding success, the recipe didn’t make it to the blog then. But seeing the joy it brought, I knew I had to share it with all of you. So, I’ve remade it, perfecting every step, ensuring that you too can experience the magic of this “pure decadence” and bask in the appreciation of your loved ones. The best part? It’s a SUPER EASY recipe that looks far more complicated than it actually is!
A Glimpse into the Magic: Before and After Baking
Before we dive into the step-by-step creation, let’s take a moment to appreciate the visual journey of this holiday masterpiece. The preparation itself is a joy, watching the simple ingredients transform into something truly artistic. The initial assembly is where the candy cane shape truly comes to life, a promise of the deliciousness to come.
The Unbaked Beauty: A Preview of Perfection
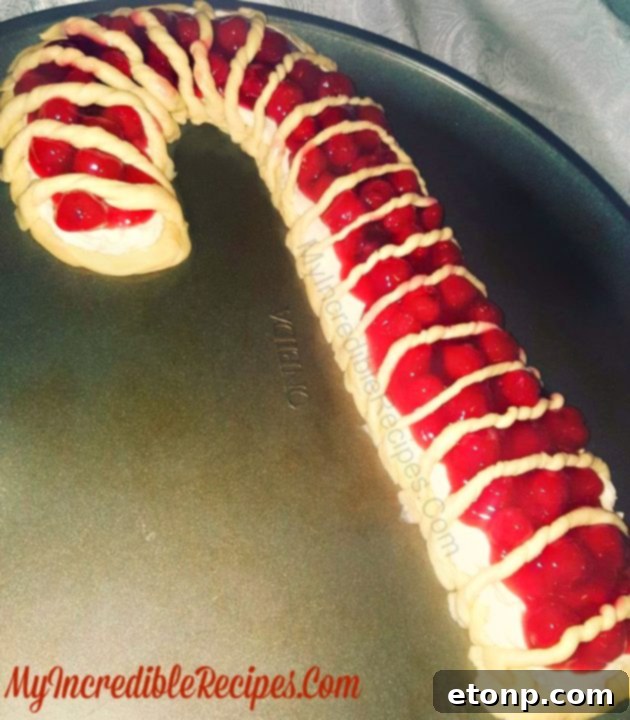
This image captures our Candy Cane Cheese Danish just after assembly, patiently waiting for its turn in the oven. Isn’t it absolutely stunning? The vibrant red cherry filling peeking through the delicate crescent roll twists, all sculpted into that iconic holiday symbol. It’s a visual treat even before it’s baked, promising a spectacular centerpiece for your Christmas breakfast or dessert spread.
The Irresistible Aroma of Freshly Baked Danish
And here it is, straight out of the oven! The moment this beauty emerges, your entire house will be filled with the most fantastic, warm, and inviting aroma. The sweet scent of baked pastry, tangy cream cheese, and juicy cherries creates an irresistible symphony for the senses. Just look at that glistening, sweet glaze already beginning to drip, promising a mouthwatering experience with every bite. It’s truly a sight and smell to behold, setting the perfect holiday mood.
Pure Decadence: A Dessert That Steals the Show
I confess, I may have gone a little overboard with photos of this pretty creation, but can you blame me? This is pure food porn! Every angle reveals its delicious charm, from the golden crust to the luscious fillings. It’s not just a dessert; it’s an experience, a moment of pure indulgence that makes any occasion feel more festive and special.
The Perfect Holiday Centerpiece
Imagine this exquisite Candy Cane Cheese Danish gracing your dinner table this Christmas. Its festive colors and elegant shape instantly elevate your holiday spread, making it a showstopper that truly embodies the spirit of the season. It’s not just a dish; it’s a conversation starter, a delightful focal point that promises both beauty and flavor. It looks amazing, doesn’t it?!
Okay, okay, I’ll stop teasing you with these delicious final shots! Now that you’ve seen the incredible finished product, let’s get down to how effortlessly you can create this masterpiece in your own kitchen. Prepare to be amazed by how simple this impressive holiday treat truly is with our step-by-step photos!
Mastering the Art: Your Step-by-Step Visual Guide
Gathering Your Simple Ingredients
Yes, it’s THIS easy… Seriously. One of the best aspects of this recipe is its straightforward ingredient list, most of which you likely already have or can easily find at your local grocery store. With just a few pantry staples and a couple of key components, you’re well on your way to creating a stunning holiday pastry. (Note: sugar and vanilla extract, though essential, might not be explicitly pictured but are crucial for the recipe and glaze.)
Shaping the Festive Foundation
The foundation of our festive danish begins with crescent rolls. Once you gracefully pop open your tubes of crescent rolls, the real fun begins! Carefully unroll them and arrange them on your baking sheet to form that delightful Candy Cane shape. Don’t worry about perfection; the beauty of this dessert lies in its homemade charm. A pizza cutter or knife can be a helpful tool if you need a little assistance in guiding the shape and making it more defined.
The Sweet and Tangy Cream Cheese Layer
Next, prepare the luscious cream cheese filling. This sweet and tangy mixture is the heart of our danish, providing a wonderfully smooth and rich counterpoint to the flaky pastry and fruity topping. Once combined until smooth and creamy, generously spread this delightful mixture evenly over your crescent roll candy cane shape. Ensure it reaches most of the surface but leave a small border around the edges to prevent overflowing.
A Burst of Fruity Flavor: Cherry Pie Filling
A vibrant burst of flavor comes from the cherry pie filling. Spoon some of this delicious, fruity goodness evenly over the cream cheese mixture. The bright red cherries against the creamy white create a stunning visual contrast and a burst of juicy sweetness that perfectly complements the other components. Remember to keep the filling slightly away from the very edges, giving it room to bake without seeping out.
The Iconic Candy Cane Stripes
Look at that beauty taking shape! To achieve that classic candy cane stripe effect, simply use the small strips of crescent rolls that you set aside earlier. Twist each strip gently and then arrange them decoratively over the cherry pie filling. Lightly pinch the sides of the twisted strips onto the base to ensure they stay perfectly in place during baking. This simple step adds so much visual appeal and makes the danish truly unique for the holidays. Easy Peasy!
Ready for the Oven!
And there it is, beautifully assembled and ready to be transformed by the heat of your oven. The layers are set, the shape is perfect, and the anticipation is building. This stage truly shows how effortlessly you can create a festive, bakery-worthy treat right at home.
The Grand Finale: After Baking!
After baking… Sweet heavens YES! The danish emerges golden brown, fragrant, and even more inviting. The crescent rolls are perfectly puffed, the cream cheese filling is set, and the cherry topping is bubbling slightly. A final drizzle of our simple glaze takes it from delicious to absolutely divine, adding that extra touch of sweetness and shine. This is what holiday baking is all about!
PIN THIS RECIPE FOR LATER!
Candy Cane Cheese Danish!
Ingredients
- Two tubes of crescent rolls
- 1 package Philly cream cheese; softened to room temperature
- 1/2 cup powdered sugar
- 1/2 tsp. pure vanilla extract
- 1 tsp freshly squeezed lemon juice
- 1 can cherry pie filling
For the Glaze:
- 1 1/2 cups confectioners’ sugar sifted to remove any lumps
- 3 to 4 tablespoons milk or water
- 2 teaspoons vanilla extract
Instructions
-
Preheat your oven to 350°F (175°C) and prepare a baking sheet by lining it with parchment paper for easy cleanup.
-
Carefully unroll each tube of crescent rolls. Set aside two sections from one of the tubes; these will be used to create the twisted decorative strips later.
-
On your prepared baking sheet, arrange the remaining crescent roll sections to form a distinct candy cane shape. Gently pinch the seams together to create a solid base.
-
If needed, use a pizza cutter or a sharp knife to refine the candy cane shape and ensure it looks symmetrical and appealing.
-
In a medium mixing bowl, combine the softened cream cheese, powdered sugar, freshly squeezed lemon juice, and pure vanilla extract. Mix thoroughly until the mixture is smooth, creamy, and lump-free.
-
Evenly spread the cream cheese mixture over the entire surface of the crescent roll candy cane shape, leaving a small border around the edges.
-
Spoon the cherry pie filling gently over the cream cheese layer, distributing it evenly. Again, ensure it doesn’t spread too close to the edges (refer to the earlier photos for guidance).
-
Take the crescent roll pieces you set aside earlier. Cut them into thin strips, then gently twist each strip. Place these twisted strips decoratively over the cherry filling to create the classic stripes of a candy cane. Lightly pinch the ends of each twisted strip onto the base to secure them.
-
Bake in the preheated oven for 12 to 15 minutes, or until the crescent rolls achieve a beautiful golden brown color and the filling is bubbly. Keep an eye on it to prevent over-browning.
For the Glaze:
-
While the danish bakes or cools slightly, prepare your simple yet delightful glaze. Place the sifted confectioners’ sugar in a medium bowl. Slowly stir in the milk or water and vanilla extract, a little at a time, until you achieve a smooth, pourable glaze consistency.
-
Once the danish has cooled for a few minutes, drizzle the prepared glaze generously over the warm Candy Cane Cheese Danish. Serve immediately and ENJOY!
Did you make this festive recipe?
Make sure to follow us on Pinterest for more incredible recipes and holiday inspiration!
Share on Facebook